September 2013 Give-A-Way - Closed

Its time again to do another Give-A-Way - September  Give-A-Way is now closed !

The winner is ;  Lois Shaw


So for September  I have a piece that someone wanted me to post when I was making them  - so when I finished I saved a particular one just for the Give-A-Way


Approx. 2" in diameter  (once it was domed its slightly less) Made from 18G copper - etched with my own zentangle patterns.  Added to the piece is one of my engraved dichroic glass piece.

Rules:
You only have to leave a comment in this thread  (no other thread)  Just to say hi or make a comment

There is no charge to you - you just have to leave a comment


On October 1st I will put names into my mug and randomly pull  one and announce 
One way to keep in touch and have reminders is to join my blog and get get my updates direct to your email - so you wont miss any Give-a-ways's or new tips - there is a follow my email button on right side of blog  and or join by group !  


What Tools and Materials Do I Need To Copper Etch

I am currently building a supplier side bar on the blog  and will eventually fill it with the suppliers I am using to obtain materials or where you can obtain materials  that I sell to.  Especially as a follow up to my classes so that there is a location to go to to follow up on all we talked about.

I thought I would also list out what basic tools and materials you need to start up for different types of projects - etching copper,   torch enamelling (bead and flat ) , lampworking  etc...

Today I will list out the Copper Etching Basic necessities - this will give you an idea of what you need to gather to start etching

As always safety is important - wear eye protection

Etching:
Copper pieces  18-24 G
Ferric Chloride - 42 Baum
Packing Tape
Rubber Gloves
Glass container (I use a  large glass baking dish from the Dollar Store)

Cleaning:
Steel Wool (000-0000)
220 Sand paper
Goo Gone (to clean off tape residue)
Acetone (to clean off stazon )
Windex (clean fingerprints before stamping)

Resist:
StazOn Stamp Pad (I use white)
Resits Pens /Staedlter red is a good resist
Rubber Stamp


Finishing
Sealer (Permalac EF)
copper wire to use as hooks to dip and hang piece for drying
Q-tips
Patina's
Nail File


Optional:

  • Hot Plate - an electric fry pan set to warm works great but a small coffee warmer will work as well if you have a small container you can sit on it - heat is not necessary but it does speed up the process
  • Foam Nail Files - to support more than one item when taping 
  • Penny Brite cleaner- additional cleaner 
  • Sand Blaster- do not have to use chemicals to clean 
  • Dremel with split mandrel for sandpaper- less elbow grease 
  • PnP Blue resist- another resist
  • Resist pens 


Update !

Lots of things happening

Patterns #1 and # 2 are back in stock on Etsy  and there are lots of Hearts as well

Classes went extremely well over the weekend in Ottawa and had a great time with all
The etching class - everyone went home with two pendants and a couple of other items as well  as we had enough time in the 4 hours to get everything done
The enamel on metal beads went well as did the lampwork with enamel class

Had a great drive home  (4-1/2 hours)  and got home before dark on the Sunday

Grace at The Glass Shoppe is a wonderful hostess  and took me to Greekfest friday night after I got there and unloaded all the class materials.  After class on Saturday we went to my favorite Italian Place in Manitoc- one of those with an outdoor venue and a band

I torched a bit last week and made some beads - which I was happy with by the time I finished modifying them.  Nothing special but at least torching :


I'll be working on numberous projects this weekend with the thought that I may be teaching a bracelet class at the Ottawa Bead Show  and going up there and having my own table as well - I have to see if I can swing that

Upcoming right after that is the Creative Craft Festival where I am going to be teaching basic beadmaking for Nortel  then the next week is the Toronto Bead Society show

a Busy 3 weekends in a row in Oct/Nov  - Looking forward to it

I am going to post in the blog a list of suppliers for etching supplies by the weekend as well

Classes at The Glass Shoppe Studio in Ottawa Aug 24 and 25

Come join me for classes at  The Glass Shoppe Studio in Ottawa
http://www.theglassshoppestudio.com/

On the 24th will be having an etched

 Etched pendant class   9 - 1 
alt alt
For use at class: Safety glasses ,patina’s, tools to clean and finish , extra copper
4 Hour Class        $ 95.00
Kit Fee:       $  6.00 (includes  1 pair latex gloves,  1 copper blank , 1 copper etched blank)
Location : The Glass Shoppe Studio
Contact : Grace/Laura/Frances 613.230.4414
weekend workshop: NO EXPERIENCE NECESSARY

Base Metal Enamel Beads  2- 6

alt
4 Hour Class        $ 95.00
Bead Kit Fee:       $  10.00
PPE – Mask          $ 15.00   or bring your own N95/100 particulate mask (N100 recommended)
Location : The Glass Shoppe Studio
Contact : Grace/Laura/Frances 613.230.4414
weekend workshop: NO EXPERIENCE NECESSARY

On Sunday from 10 -3
Enamels on Lampwork 

alt

This workshop will emphasize:
  • Safety
  • Tips
  • Firing schedule – including the 3 stages of firing  enamels -  sugar, orange peel  and  full fuse stage (glossy)
  • Boiling
  • Enamels stringers
  • Brass embossing
  • Creating your own  patterns by – rolling, sifting, stencilling
Students will need a PPE – Mask:   N95/100 particulate mask (N100 highly recommended by the Glass Shope Studio)
Cost:  120 (includes all glass, enamels and use of tools.  Student need only show up with didys and their favourite tools)
Location : The Glass Shoppe Studio
Contact : Grace/Laura/Frances 613.230.4414
Sunday workshop: 10-3pm. Student must be an advanced Beginner/Intermediate

Out of Stock on Pattern #1 and #2

Unfortunately I am out of Pattern #1  - I ordered in time but when I opened the new box they had sent me my Hearts pattern  (even though I confirmed the pattern #1 with them - they made a boo boo but  they make such good stamps I really cant complain )  so it may take a couple of weeks to get it back in  and I had a run on Pattern #2 so I am out of those too - (actually I have 1 left  and you need to just email me if you want it )
so give it a couple of weeks and the Etsy store will be back up with these Patterns to order in stock

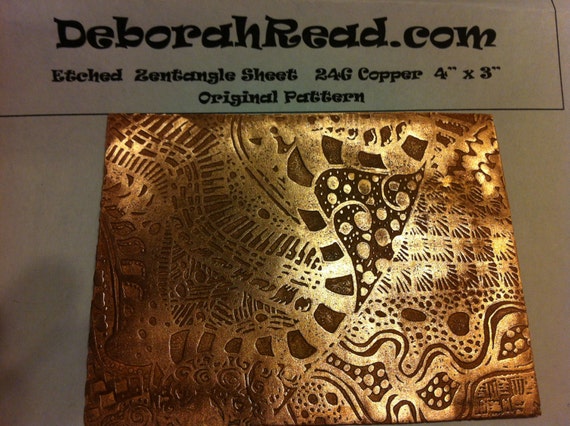
If you have not  been to the store lately - I have added 4" x 3"    sheets of etched copper to the store for those that like to cut their own designs from sheet - these were also made from the rubber sheet and staz-on

Etched 24G Copper Sheet - 3" x 4"  - Zentangle Pattern

I noticed some very lovely small booklets with metal covers - I'll have to find some samples to show - I want to try these as well

Another customer posted on her blog  what she has done with the rubber stamps - amazing work
http://rosemarysclay.blogspot.ca/

see her results from using the rubber stamps and staz-on

she did a wonderful job and added edging to her bracelets
cant wait to see them finished


More EtchedCopper Pipe

I got the smaller pipe into the ferric today
The pipe was a little shorter so I poured a little out 
and I didnt have a plug so I had to use some Plasticine to seal the bottom 
filled it with sand and put the post in so it sat between two pieces of tape 

Left it for about 2-1/2 hours (no heat)
Nice etch 

cuts it rather nicely 
Clean and deep 

So I cut up the pipes - I used a small chop saw for the larger pieces 


The next step is to solder ends onto them 
so they will look like this 
Large

Small 

I just have to decide if the ends will be plain or to etch the ends - (might be too much )
I'll get to them soon 

The etching of the washers is not turning out so well - did another batch 
heat press works great with the PnP

what the PnP looks like after transfer 

In the etch for 2-1/2 hours 

not working as well as the stamp - Hmmmmmm  there is some etch but not even as good as the staz on 
seems to soak off - some sort of reaction with the metal and the ferric 
will have to work on this more 


Etched Copper Pipe - using PnP

So I found a container that was tall and thin -didnt want too big to waste any chemical
was a plastic container from my plastic ties

Because it was plastic I was not going to heat it up so I estimated it might take about 2 to 2-1/2 hours

I loved the fact that the PnP worked so well  so I expected a really good etch
I prepped the tube by putting in a rubber stopper on one end and filled it with some art sand for weight 
I partially filled the container and then put the tube in and then filled till it was really close to the top
I put a bend mandrel in the sand just to give me something to balance and taped either side 

this held the tube in the center of the chemical while it etched 
I put in at 8:20 and I took it out at 10 pm 
If it was heated and since fresh ferric it might only take about 1-1/2 hours to etch  - I find the heat does make it more aggressive and I guess there are times you want that 
I think when I do the stainless washers again I am not going to heat it up 
and let it etch for however long it takes  and keep my eye on it this time 

soooo - I pulled it out of the etch - let it drip and drain for a minute - took paper towel and took it to the sink and washed off and put some baking soda on it to stop the etch 

Nice Etch


Just had to clean it up to see what it would look like 
so I sandblasted the PnP off and I like the effect of the sandblasting - it takes all the materials from the pipe and all the grooves  - used a bit of Penny Brite and some steel wool 


Came up really clean with very little effort or additional chemicals for cleaning

Best results so far 
Going to cut them up and make beads