Finished another House with my Granddaughter

Yup did another little house with my granddaughter - she wanted one for her teacher for valentine day


Looks like I'm starting a town - they work up pretty quickly once you do the first one - you know where everything goes 

RANGOLI STENCIL- what the heck is that

I have been seeing this video around - a guy using some sort of stencil and sand/sugar art  to make a beautiful manadala -

https://www.youtube.com/watch?v=eza67LRxIN0

this one I found is actually using the ones I bought off ebay so super bonus to see that
https://www.youtube.com/watch?v=tpyWEJLJnas

I can only think glass frit when I see it and want to try - so hunted down the stencils - bought them off ebay  of all places -

RANGOLI STENCIL

they are 8" in diameter - a good size to try for glass - comes with a little shaker
I bought 2 - only 11.00 each cdn  (7.93 u.s.) with free shipping - cant beat that to try out
so waiting for them to come - takes time  and they even wanted to activate the powers of the mandala

I cant wait for them to show up - I may even brave the cold to try it out -  

Paper House coming along

Who knew this was so much fun ........
I cam home and was finishing up with the pieces I had cut -  just a few more pieces and its done - learned a lot from the first one -  and not as hard as I first thought -  seeing all the pieces was quite inundating  when first looked at but  it all makes sense now - just like sewing
Like a puzzle just in 3D

Starting to assemble some things for the spring to try out once the studio is open again (looking for WARM) 


Some Paper Cutting Fun

I have  a Brother  Scan N Cut cutter -  Love this machine -
I bought just before Halloween a Haunted Forest theme kit for 6.99 from SVGcuts.com -   provided all the cuts needed to make a cute house - stands a good 10" high and is a ball to put together - much like a puzzle - even after watching the tutorial I  glued some of the pieces backwards but saved it any - its like sewing  - the first one takes longer and a lot of errors later - but  when you go to make another your ready to roll - there is a good tutorial but I should have laid out my pieces and watched it all the way through first - but we were so excited -  converting the svg to the scan n cut format took a while - lots of pieces - then we started cutting  -

My Granddaughter wanted me to make this - suddenly it was just me making it !  but having a ball putting it together and learning more about my machine

so far I have most of the house (even if it is backwards) and started putting the base together - all thin construction paper and colored pattern paper -( I did not cut or install the inside liners - I'll do that next time -

  but next time I want to buy the Halloween paper from Graphic45 :  http://www.g45papers.com/an-eerie-tale?keyword=halloween for a more visual effect

but what paper I had around the house looks pretty good too .... (the scissors are more for weight while the glue was drying - everything else is cut by my cutter


New Years Resolutions - a bit early

Looking back I had a wonderful crafty year working with clay, metals, punches, glass , paints etc.. and really want to do more next year - new items for me this year were of course the Big Dragon Eyes,  getting back to glass painting and working with kiln glass - and frits  and of course the crazy wine bottle slumping that I totally enjoyed

Looking to get a new intermediate size kiln in the spring  with possibly a final bigger one for summer so I can work larger glass pieces and get some ideas out there

More metal - more forming and cutting  - I totally enjoyed my ring class -  and using silver again

I look forward to putting more time into my crafts this year - so wishing everyone a very Happy New Year


November Give-A-way - redraw winner is

I do state on my draw that you need to have an email address that I can contact you with after the draw
Unfortunately the winner for November  did not have one -so it has been impossible for me to contact

so

I said that If I did not hear from them by today the 10th I would do a redraw -  so drum roll and the winner is  Here Bead Dragons !!!!

I will contact you via email and if you can send me your mailing address I can get this out right away and hope that you can get before Christmas !!!

Congratulations

Scan N Cut by Brother -JPEG or JPG images or text to Scan n cut

Haveing a great time with my Scan n cut - all the things I've made so far - and took a 3 hour class this week and now know how to do more !

Very excited as I'll be doing vinyl cut outs etc..
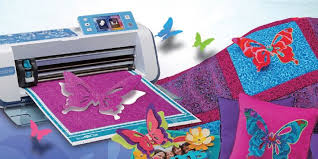
Image result for scan n cut cm550dx

will be outlining some amanzing things to share

A lot of people want to do text and images and its easy -
Taking a JPG/JPEG and making into a SNC file
In this sample I am using a Text Name but you can create a whole page document to bring into your scan n cut

I started by finding the font I wanted - In this case I want "Oliver" this is the Frozen Font that just about anyone with a little girl in the family needs - go to http://www.1001freefonts.com/


search for oliver - scroll down the page and there it is - download -


now you can save the zip files in folder -

but I use word a lot and if I want for something else I'll just grab again - open the zip folder and select the font and click to open- this gives you a page of the fonts - top left corner has install - select and it puts it right into your word -

Open word and type in you text -
you can either choose at this time the font or just type and then highlight and change - made the size about 150 so its big and easy to see and work with - best to use black as the color so that it is recognized easier for the outlines -

Now there is a beautiful app called the SNIP Tool in windows -
its under your apps in 8.1 as windows accessories - I have it fixed to my tool bar - click on the snip tool - select new - highlight the text (try not to get the cursor in the clip) it will come up in its own window - now saveas (name it to a location you can find after) and make sure its a JPEG/JPG file - ok now we have our text


Open canvas - select new project - select the leaf box -


choose file - select the file you just saved
to the right at top two boxes lets start with the "outline" box and you will see another box with max number of colors - now reduce that to 2 - and hit the preview button - and you will see blue lines around the letters - but o dear - the centers in A or D etc are not highlighted - and we want those - so go up to top and choose color - and then preview - voila

if your satisfied with the outlines then click ok and it transfers your design to the mat for manipulation

Each letter can be moved

You may note there are heavier outlines on certain areas - 

you can delete the extra cuts by highlighting and deleting (garbage can or your delete button) -


to group them just select all by highlighting all the text - then the edit tab - and group - now its all one group to move around - you can also reverse this with the back arrow at top

or highlight and ungroup from the edit tab


- to save - click the box with the down arrow at top

and this saves to cloud with Brother -

or hit download

and it will create the file for cutting -(remember where you save it - as you take from file and move to your USB -

if you practice this you will have a great time with vinyl and images for cutting because I sure will -