Etched Copper Earrings - Using Staz On Ink and Zentangle Rubber Stamps

Being happy with the test results  of the stazon stamp pad and my zentangle stamps - I decided I wanted to accomplish 2 dozen Earring sets by Friday . Or at least etched and ready to have a patina and sealed

So the first two dozen will be the same elongated copper stamping (got them at Metalliferous) that I did the samples in .


The hard part is always cleaning and prepped - My favourite tool is the dremel  with the split mandrel and sandpaper.
I laid them out and started cleaning
I made my way down the line with the dremel - I only clean one side as that is for the stamping side - no sense cleaning the other till your ready to finish -  and once finished cleaning with the dremel and sandpaper- I donned my rubber glove and finished them with steel wool 
the rubber glove was to make sure I didnt leave any fingerprints and oil on the blanks.  Not just so you have a clean surface - any oils may create a resist to the ferric chloride as well.

Once finished they were ready for stamping
I prepped the rubber stamp (available on etsy - see side bar) 
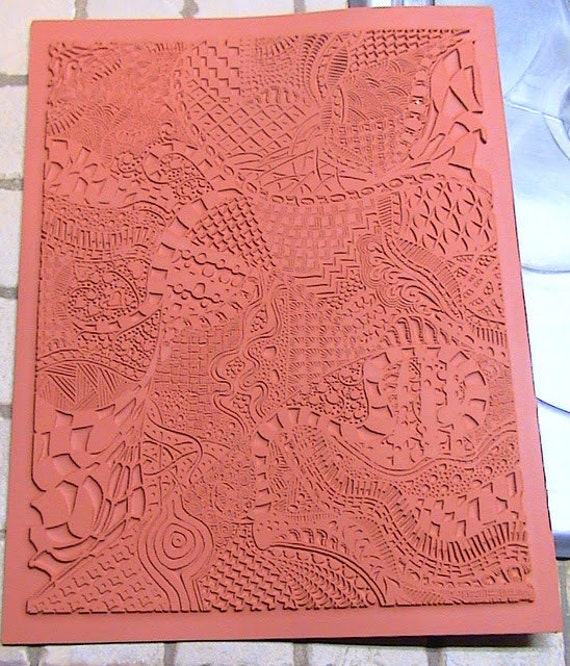
Zentangle Unmounted Rubber - Clay Texture Stamp -  Pattern 2(this is stamp #2 pattern)    I took the stazon and made sure the pad was properly wet with ink and dabbed it onto the stamp area I wanted to work -  I did not do the whole stamp as it would dry quickly and be wasted -the white in this case - not sure if it really matters what color you use as the ink dries quickly and is taken off with acetone.  And my micheals only carries the white for some reason.
I place the clean side down carefully - pressed down evenly - placed one finger at end and pressed  down which raises the other end and again carfully grabbed the sides and set to the side to dry .  I was trying to keep the pairs relatively close in pattern as I stamped - but they are not identical - that is the randomness (is that a word) of the zentangle. Because I wanted to use the same general area I again dabbed the ink onto the stamp and just kept going.

Some of the stamping was pretty darn close to being the same 
Hard to see with the light reflection but all two dozen stamped and now ready to go into the etching solution.
It takes only a minute or two for the staz on to dry which is great - makes it easier to handle 

I prepared  so that each tape would hold the pair - when its a single metal bracelet it suspends across the container - but because these are smaller the weight bends them in the center  so you want them to be balanced and not fall to the center of the container- just enough so they are suspended on the surface  - I could probably fix this by adding some sort of support on the tape or making a floating double sided tape on some foam - which I am looking around for - havnt had any in my shipping /packing lately - my current set up holds 6 sets at a time - need to get another large glass container and get out my other hot plate.
anyway - only 3 more batches to go - I have to stay up to at least 11pm tonight and take them out and put them into baking soda to stop the etching process - and dry them off - while the first batch is in tomorrow Ill start to finish - Yawn - 1-1/2 hours to go ........ so I will show tomorrow the results of batch 1 

\


Etched Zentangle Copper Earrings

My good intentions of going home and soldering ends on the copper pipe pieces last night went bust - babysitting the grandkids and was tired.

All I did was  to dip two pairs of the sample earrings in the new sealer I bought -


I take some of my copper wire and make hooks to hook through the connection hole on the top of the earring,(they are reusable )  then the other end I put another hook to hang to dry on a rod in front of a fan (helps speed up the drying time - which is pretty fast on its own) -I dip the earrings while on the wire right into the can - dangle to let drip- sort of touch the side to get the last drops -    once dipped just hang and take a piece of paper towel and slightly touch the bottom - this wicks away any drip forming at the bottom.   I am dipping twice for protection.  Totally love this stuff.  (but I butchered the tin when I opened it - I have to ask how to properly open as it has one of those protective plastic rings and shows some sort of tool to remove -  and trying to open the tin I kept ripping the lid )  so much easier than the wax and buffing I was doing.

These earrings I left flat and did not patina - just air patina - these are from the other day - my testing using the Stazon stamp pad - which was total success with my zentangle stamps.  Again I ran to the studio and popped on some Erring hooks so I could wear today.  This weekend its going to be a huge stamping /etching  time at my studio - want to make lots of items.  I also want to make a necklace so I have bracelets, earrings and necklaces in etched copper and zentangles.


I LOVE THIS STUFF
so easy to use and drys fast.  I found when I googled someone suggesting the Rio Sealer - but they also suggested this sealer -which I got locally from Sculpture Supply in Toronto.  If you go to their site :   http://www.permalac.com/permalacef.asp    you can buy direct from them in Pennsylvania and they have a distributor list as well.

Someone asked me about the swage tool (as I called it) and where to get (sometines called a U-bender block, bending block ) -  Rio Grande has them and Metalliferous has the one I have -  Metalliferous if you do not know is one of my favorite places to get my copper stampings and other items - Brass, Aluminum, copper etc... they carry just about everything.
Here is the link to the bending block:

http://store.metalliferous.com/prodinfo.asp?number=PE264%2E00


Etched Enamel Copper Beads

So I am very close to making my etched Enamel Beads

I'll solder ends on the samplers tonight using a hight temp solder (higher than the enamel so it will not melt - I hope)

this is sort of the process I am going to follow to do testing  as I want to dip my etched beads into a clear coat - its a step by step and I want to make the exact bead - if I can - cool tools to make as well for dipping the beads.  cant wait to try them out


http://www.enamelworksupply.com/Resources/Web%20bead%20project.pdf

I have had all the materials for at least 10 years to do this and its about time I finally used them . I have lots of copper beads I've been collecting over the years and ones I've made - so I think the time has come


Etched Copper Earrings - Zentangle

I got up early enough to go to the studio to make my etched pieces into earrings and wore them today
Have more at home to make up - I really like the sealer I used - way better than the wax


Etching Copper Pipe and Blanks with Zentangle Stamp

I decided to use my zentangle stamp and copper pipe for etching
(stamps are available at my etsy store  - check out left side of blog )

I found that cutting to size before rolling was harder - so I found leaving ends long enough to hold while rolling made it easier

I put a magazine under the stamp so it gave it some flexibility 

Once completed I let dry and then cut the ends off 
I prepped the stamp 

I placed the blanks onto the stamp and then removed and let it dry

Put into the etch 
Once etched I punched holes as these are going to be earrings 
I decided I did not want just flat earrings but rolled

Using a swage tool 


I started at the largest 

bent the earrings to the angles I wanted 


I found a really great sealer - its thin enough to dip and to apply and spray - really impressed with the bracelets I did with them (I'll have to post those seperately)
I did liver of sulpher and cleaned up the earrings and dipped them 
they dry very quickly 


going to have to play with pipe some more - enamelling -   I've been wanting to etch copper pipe and make beads and enamel them - so that is almost close to happening 


ALSO CHECK OUT PNP BLUE AND COPPER PIPE THREAD 


AND 
ETCHING COPPER PIPE 


Etching Copper Pipe

I decided to try some other resists other than PnP
I used the Sharpie's  to help with the other bracelets and decided to use a rubber stamp and some copper pipe to make some large beads.

I got some copper pipe from Home Hardware - 3/4"  and cut it with the pipe cutter 
Using Staz On Opaque - White (was all I had )  as a resist  I prepared the rubber stamp and rolled the cleaned pipe over the rubber stamp.  The Staz on dries pretty quickly
I stamped a copper blank as well and put them into the etching solution (ferric Chloride) 

I put plasticine on the end fo the pipe to keep the ferric chloride out of the centre of the pipe 
I used a plastic container - round and tall for the pipe - was an old container from Crystal Lite 
I filled but not all the way to the top with Ferric Chloride and set i on the heat plate - its not too hot that it would melt the plastic container - this is still a work in progress - got to find a better way to put into the accid - maybe hanging sealing off the end with silicone or a cork 

I put a piece of tape across the top to ensure the pipe did not move 
after about 2 hours I pulled out the sampler 
The Staz On worked beautiflully - did not come off and the etch lines were clean 

I was truly surprised  and pleased with the pipe 
I'l going to see about using smaller pipe so I can bend - picked up pipe bender from princess auto 

I cut pieces after - the edges are not perfect but I can fix that , not sure how to finish yet.  I might solder or reduce the ends - or even flare - O that sounds like a plan 
Once the ends are soldered then I will enamel 
this entails using a solder that is a higher temp than the enamel 
The reduced ends are perfect for the punched circles I have ready 
but that is tomorrow 


ALSO CHECK OUT ANOTHER BOG THREAD FOR THE PNP BLUE APPLICATION 


Jewelry Artist Magazine Sept. 2012 - Gallery

My face made it to the Sept 2012 issue of the Jewellery artist - missed it the first time thorugh the other day and then was taking the time today to read and found it on page 15 lower left corner

Really good articles this month on riveting and enamelling

Art Jewelry Artist Magazine Newsletter 
Art Jewelry Subscriber Gallery
Anyone can view the work in the Subscriber Galleries on our website, but only subscribers to Art Jewelry magazine can post images of their work there. The Art Jewelry staff is looking for your work. We'll announce our favorite new pieces in next month's first newsletter -- and we'll feature some pieces in a future print magazine, as well! Both Robert Grey Kaylor and Deborah Read have their pieces featured in the September 2012 issue.  

To have your work considered, post images of up to 5 pieces per week in any of these categories:


Homemade Jewelry Metal Press

I picked up my log splitter yesterday at Princess auto  (119.00)  and put it together today

I turned the "V" upside down so the flat side was facing down so it was a flat surface

I assembled - and it was really cool as the pump has a foot pedal  and a foot air release which makes it easier to work with  no twisting to release the air or taking out the handle to use to release the air.
Easy assembly and has handles to wheel it around and hold while pumping


I have my Bonny Doon press items (silhouette   presses)
the holder, the brass design and the urethane disc's


You put your brass design on the bottom design side up

a piece of metal (this case its 18g copper) I just cut to fit inside the container


then a piece of urethane that will push down and into the design (if enough pressure) 

and finally the plunger
They say that if you try without the container the urethane may split when pressed down 
the sides of the container - keep it vertical as it pushes down 

 right now the top piece does not come down far enough I jury rigged another metal piece to raise the silhouette press just so I can test and see what I have to do.


I started pumping - my legs do have more strength for pumping than my arms so I am very happy with this set up.

I did the best I could till the metal riser started to buckle a bit so I realized that this was not going to work - it was giving in with the pressure .    So the piece did not get full pressure directly


As you can see it started but would require further pressure -  Possibly if I used a thinner gauge I could probably get the design - but I want to use 18g 


so I'll take the unit to work with me on Monday and ask my guys in the welding shop to drill me a couple more holes to bring the top "V" down further and to weld me a flat piece on the base as there are some bolts that slightly stick up and I would like it flat. Possibly have them put a large flat piece on the top as well so that when they meet they will be flat - I want to be able to use this as well for the pancake dies as well

So not a failure - just a step closer to having my press